Quickstart
To try Parsl now (without installing any code locally), experiment with our hosted tutorial notebooks on Binder.
Installation
Parsl is available on PyPI and conda-forge.
Parsl requires Python3.10+ and has been tested on Linux.
Installation using Pip
While pip can be used to install Parsl, we suggest the following approach
for reliable installation when many Python environments are available.
Install Parsl:
$ python3 -m pip install parsl
To update a previously installed parsl to a newer version, use: python3 -m pip install -U parsl
Installation using Conda
Create and activate a new conda environment:
$ conda create --name parsl_py310 python=3.10
$ source activate parsl_py310
Install Parsl:
$ python3 -m pip install parsl

or

$ conda config --add channels conda-forge
$ conda install parsl
The conda documentation provides instructions for installing conda on macOS and Linux.
Getting started
Parsl has much in common with Python’s native concurrency library, but unlocking Parsl’s potential requires understanding a few major concepts.
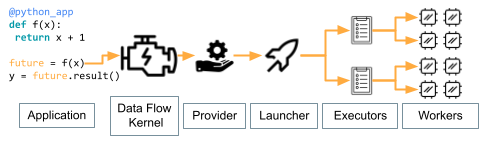
A Parsl program submits tasks to run on Workers distributed across remote computers. The instructions for these tasks are contained within “apps” that users define using Python functions. Each remote computer (e.g., a node on a supercomputer) has a single “Executor” which manages the workers. Remote resources available to Parsl are acquired by a “Provider”, which places the executor on a system with a “Launcher”. Task execution is brokered by a “Data Flow Kernel” that runs on your local system.
We describe these components briefly here, and link to more details in the User Guide.
Note
Parsl’s documentation includes templates for many supercomputers. Even though you may not need to write a configuration from a blank slate, understanding the basic terminology below will be very useful.
Application Types
Parsl enables concurrent execution of Python functions (python_app)
or external applications (bash_app).
The logic for both are described by Python functions marked with Parsl decorators.
When decorated functions are invoked, they run asynchronously on other resources.
The result of a call to a Parsl app is an AppFuture,
which behaves like a Python Future.
The following example shows how to write a simple Parsl program with hello world Python and Bash apps.
import parsl
from parsl import python_app, bash_app

@python_app
def hello_python (message):
    return 'Hello %s' % message

@bash_app
def hello_bash(message, stdout='hello-stdout'):
    return 'echo "Hello %s"' % message


with parsl.load():
    # invoke the Python app and print the result
    print(hello_python('World (Python)').result())

    # invoke the Bash app and read the result from a file
    hello_bash('World (Bash)').result()

with open('hello-stdout', 'r') as f:
    print(f.read())
Learn more about the types of Apps and their options here.
Executors
Executors define how Parsl deploys work on a computer. Many types are available, each with different advantages.
The HighThroughputExecutor,
like Python’s ProcessPoolExecutor, creates workers that are separate Python processes.
However, you have much more control over how the work is deployed.
You can dynamically set the number of workers based on available memory and
pin each worker to specific GPUs or CPU cores
among other powerful features.
Learn more about Executors here.
Execution Providers
Resource providers allow Parsl to gain access to computing power. For supercomputers, gaining resources often requires requesting them from a scheduler (e.g., Slurm). Parsl Providers write the requests to requisition “Blocks” (e.g., supercomputer nodes) on your behalf. Parsl comes pre-packaged with Providers compatible with most supercomputers and some cloud computing services.
Another key role of Providers is defining how to start an Executor on a remote computer. Often, this simply involves specifying the correct Python environment and (described below) how to launch the Executor on each acquired computers.
Learn more about Providers here.
Launchers
The Launcher defines how to spread workers across all nodes available in a Block.
A common example is an MPILauncher, which uses MPI’s mechanism
for starting a single program on multiple computing nodes.
Like Providers, Parsl comes packaged with Launchers for most supercomputers and clouds.
Learn more about Launchers here.
Benefits of a Data-Flow Kernel
The Data-Flow Kernel (DFK) is the behind-the-scenes engine behind Parsl. The DFK determines when tasks can be started and sends them to open resources, receives results, restarts failed tasks, propagates errors to dependent tasks, and performs the many other functions needed to execute complex workflows. The flexibility and performance of the DFK enables applications with intricate dependencies between tasks to execute on thousands of parallel workers.
Start with the Tutorial or the parallel patterns to see the complex types of workflows you can make with Parsl.
Starting Parsl
A Parsl script must contain the function definitions, resource configuration, and a call to parsl.load
before launching tasks.
This script runs on a system that must stay on-line until all of your tasks complete but need not have
much computing power, such as the login node for a supercomputer.
The Config object holds definitions of Executors and the Providers and Launchers they rely on.
An example which launches 4 workers on 1 node of the Polaris supercomputer looks like
from parsl import Config
from parsl.executors import HighThroughputExecutor
from parsl.providers import PBSProProvider
from parsl.launchers import MpiExecLauncher

config = Config(
    retries=1,  # Restart task if they fail once
    executors=[
        HighThroughputExecutor(
            available_accelerators=4,  # Maps one worker per GPU
            address=address_by_hostname(),
            cpu_affinity="alternating",  # Prevents thread contention
            provider=PBSProProvider(
                account="example",
                worker_init="module load conda; conda activate parsl",
                walltime="1:00:00",
                queue="debug",
                scheduler_options="#PBS -l filesystems=home:eagle",  # Change if data on other filesystem
                launcher=MpiExecLauncher(
                    bind_cmd="--cpu-bind", overrides="--depth=64 --ppn 1"
                ),  # Ensures 1 manger per node and allows it to divide work to all 64 cores
                select_options="ngpus=4",
                nodes_per_block=1,
                cpus_per_node=64,
            ),
        ),
    ]
)
The documentation has examples for other supercomputers here.
The next step is to load the configuration
parsl.load(config)
You are then ready to use 10 PFLOPS of computing power through Python!
Tutorial
The best way to learn more about Parsl is by reviewing the Parsl tutorials. There are several options for following the tutorial:
Use Binder to follow the tutorial online without installing or writing any code locally.
Clone the Parsl tutorial repository using a local Parsl installation.
Read through the online tutorial documentation.
Usage Tracking
To help support the Parsl project, we ask that users opt-in to anonymized usage tracking whenever possible. Usage tracking allows us to measure usage, identify bugs, and improve usability, reliability, and performance. Only aggregate usage statistics will be used for reporting purposes.
As an NSF-funded project, our ability to track usage metrics is important for continued funding.
You can opt-in by setting usage_tracking=3 in the configuration object (parsl.config.Config).
To read more about what information is collected and how it is used see Usage Statistics Collection.
For Developers
Parsl is an open source community that encourages contributions from users and developers. A guide for contributing to Parsl is available in the Parsl GitHub repository.
The following instructions outline how to set up Parsl from source.
Download Parsl:
$ git clone https://github.com/Parsl/parsl
Install:
$ cd parsl
$ pip install .
( To install specific extra options from the source :)
$ pip install '.[<optional_package1>...]'
Use Parsl!